Expo에서 알림을 구현하기 위해서는 expo-notifications를 사용할 수 있다.
알림은 크게 앱 자체에서 발생시키는 로컬 알림(Local Notification) 과 서버에서 클라이언트로 전달하는 푸시 알림(Push Notification) 으로 나눌 수 있다.
expo-notifications는 두 방식 모두 지원한다.
설치하기
먼저 필요한 라이브러리를 설치한다.
pnpm expo install expo-notifications expo-constants그리고 app.json에 expo-notifications 플러그인을 추가한다.
{
  "expo": {
    "plugins": ["expo-notifications"]
  }
}
로컬 알림
로컬 알림은 별도의 서버 없이 앱 자체에서 발생시키는 알림이다.
다음과 같이 scheduleNotificationAsync를 사용하여 알림을 띄울 수 있다.
// src/app/index.tsx

import * as Notifications from "expo-notifications";
import { Button, StyleSheet, View } from "react-native";

Notifications.setNotificationHandler({
  handleNotification: async () => ({
    shouldPlaySound: true,
    shouldSetBadge: false,
    shouldShowBanner: true,
    shouldShowList: true,
  }),
});

export default function HomeScreen() {
  const requestPermission = async () => {
    const { status } = await Notifications.requestPermissionsAsync();

    if (status !== "granted") {
      console.log("알림 권한 거부됨");
      return false;
    }

    return true;
  };

  const showNotification = async () => {
    const granted = await requestPermission();

    if (!granted) return;

    await Notifications.scheduleNotificationAsync({
      content: {
        title: "알림 테스트 🔔",
        body: "Expo 알림이 정상적으로 동작합니다.",
        data: {
          screen: "home",
        },
      },
      trigger: null,
    });
  };

  return (
    <View style={styles.container}>
      <Button title="알림 보내기" onPress={showNotification} />
    </View>
  );
}

const styles = StyleSheet.create({
  container: {
    padding: 20,
    paddingTop: 100,
  },
});
trigger: null로 설정하면 알림이 즉시 발생한다.
푸시 알림
푸시 알림은 서버에서 특정 사용자에게 알림을 전달하는 방식이다.
Expo Push Service를 사용하면 서버가 직접 APNs나 FCM을 다루지 않고 다음과 같은 구조로 알림을 보낼 수 있다.
Server
  ↓
Expo Push Service
  ↓
APNs / FCM
  ↓
iOS / Android
푸시 알림을 보내기 위해서는 먼저 각 기기의 Expo Push Token을 발급받아야 한다.
EAS 프로젝트 연결
Expo Push Token을 발급받기 위해 프로젝트를 EAS에 연결한다.
eas init정상적으로 연결되면 app.json 등에 다음과 같은 EAS Project ID가 추가된다.
{
  "expo": {
    "extra": {
      "eas": {
        "projectId": "<your-project-id>"
      }
    }
  }
}
Push Token 발급
다음 함수를 작성한다.
// src/utils/register-for-push-notifications.ts

import { Platform } from "react-native";
import * as Notifications from "expo-notifications";
import Constants from "expo-constants";

export async function registerForPushNotifications() {
  if (Platform.OS === "android") {
    await Notifications.setNotificationChannelAsync("default", {
      name: "default",
      importance: Notifications.AndroidImportance.MAX,
    });
  }

  const { status: existingStatus } = await Notifications.getPermissionsAsync();

  let finalStatus = existingStatus;

  if (existingStatus !== "granted") {
    const { status } = await Notifications.requestPermissionsAsync();

    finalStatus = status;
  }

  if (finalStatus !== "granted") {
    return null;
  }

  const projectId =
    Constants.expoConfig?.extra?.eas?.projectId ??
    Constants.easConfig?.projectId;

  if (!projectId) {
    throw new Error("Expo projectId를 찾을 수 없습니다.");
  }

  const token = await Notifications.getExpoPushTokenAsync({
    projectId,
  });

  console.log(token.data);

  return token.data;
}
정상적으로 실행되면 다음과 같은 Expo Push Token이 출력된다.
LOG ExponentPushToken[<your-token>]
이 토큰을 서버에 저장해두면 이후 해당 기기로 푸시 알림을 전송할 수 있다.
getExpoPushTokenAsync()로 발급받는 Expo Push Token과getDevicePushTokenAsync()로 발급받는 APNs/FCM 네이티브 토큰은 서로 다르다.Expo Push Service를 사용할 경우에는
getExpoPushTokenAsync()로 발급받은 토큰을 사용해야 한다.
Android 설정
Android에서 Expo Push Notification을 사용하려면 Firebase 설정이 필요하다.
필요한 것은 크게 두 가지이다.
google-services.json: Android 앱을 Firebase/FCM에 연결하기 위한 설정 파일- Google Service Account Key: Expo Push Service가 FCM V1을 통해 알림을 전달하기 위한 인증 정보
Firebase 프로젝트 생성
먼저 Firebase Console에서 프로젝트를 생성한다.
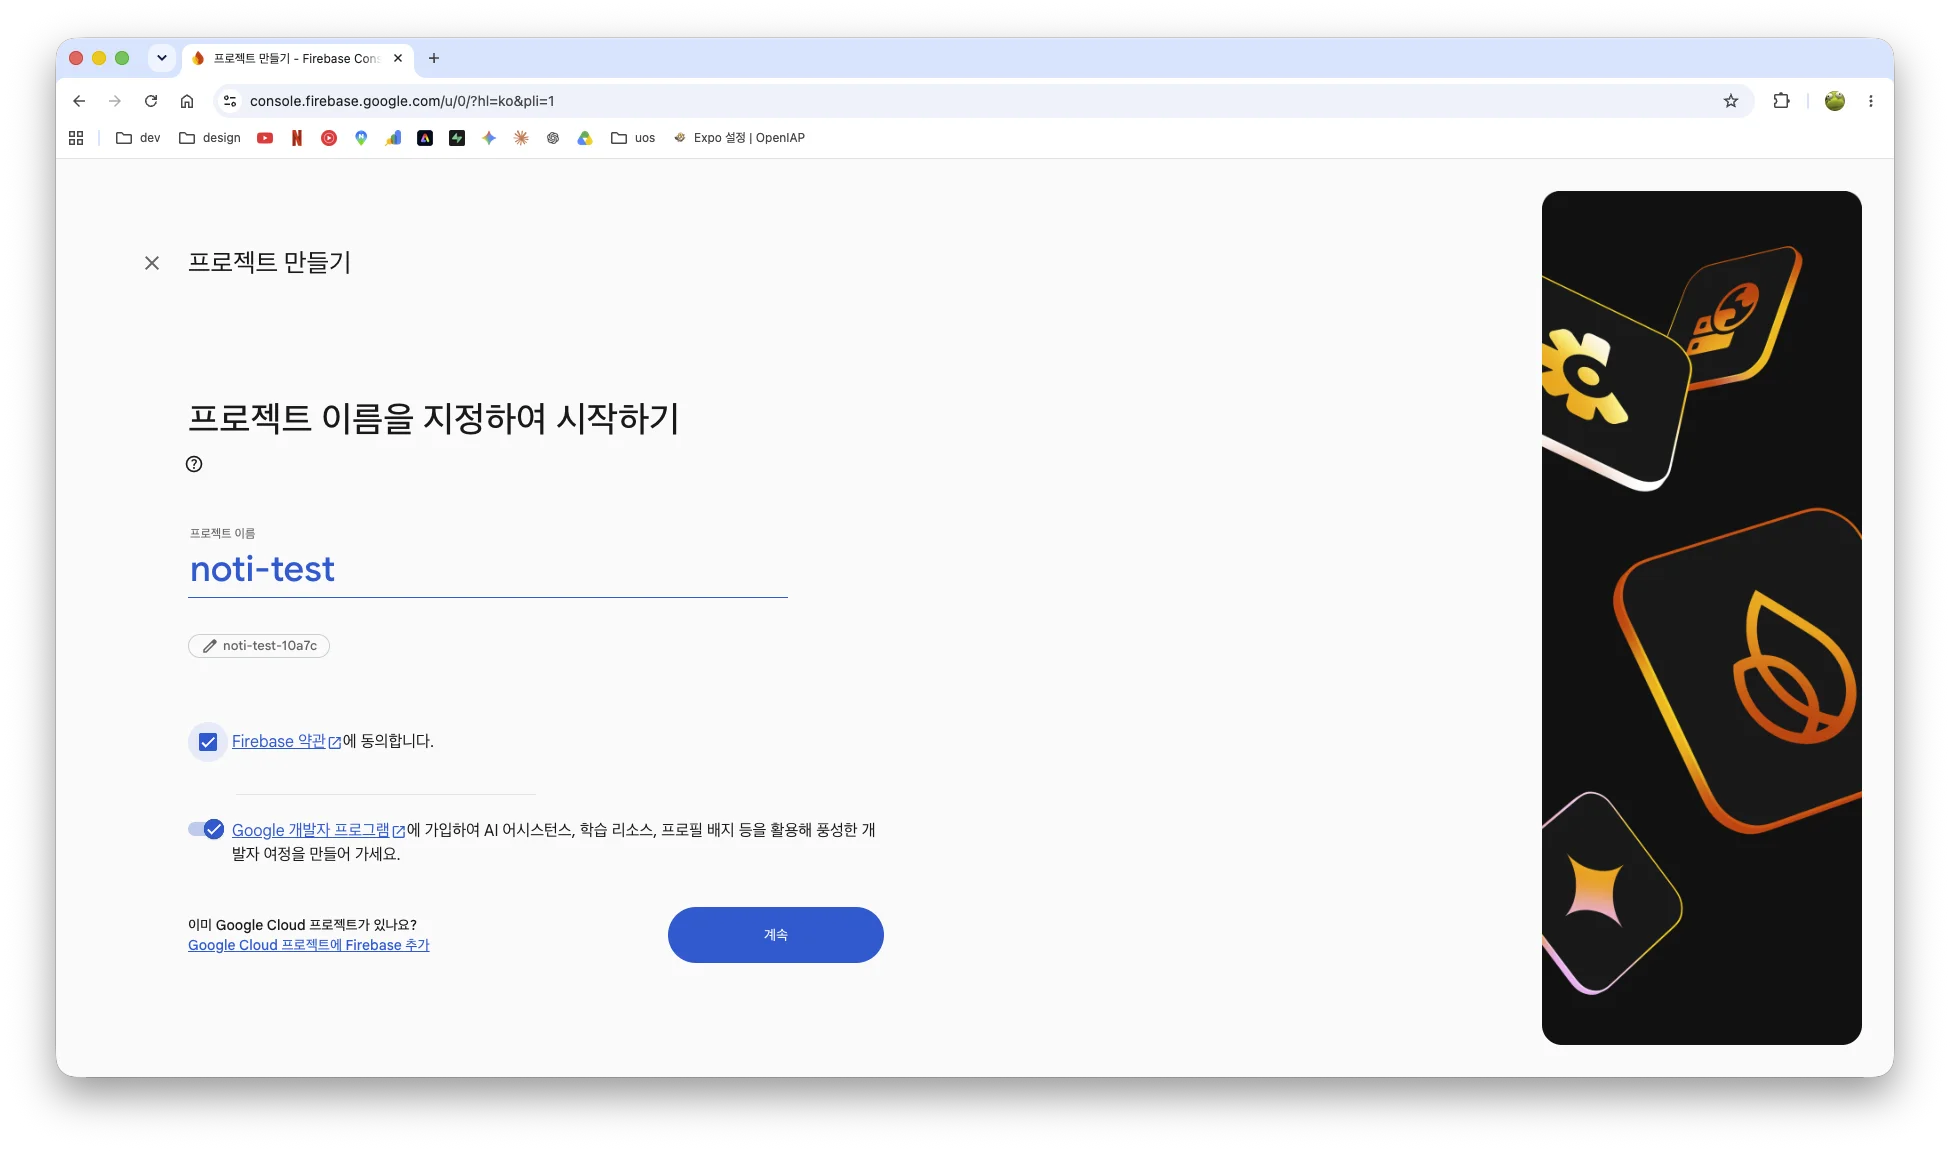
프로젝트 생성 후 Android 앱을 추가한다.
이때 Android 패키지 이름은 Expo 프로젝트의 android.package와 동일하게 설정해야 한다.
예를 들어 다음과 같이 설정했다면,
{
  "expo": {
    "android": {
      "package": "com.sid12g.notitest"
    }
  }
}
Firebase에서도 Android 패키지 이름을 다음과 같이 등록해야 한다.
com.sid12g.notitestgoogle-services.json 설정
Android 앱을 등록하면 google-services.json을 다운로드할 수 있다.
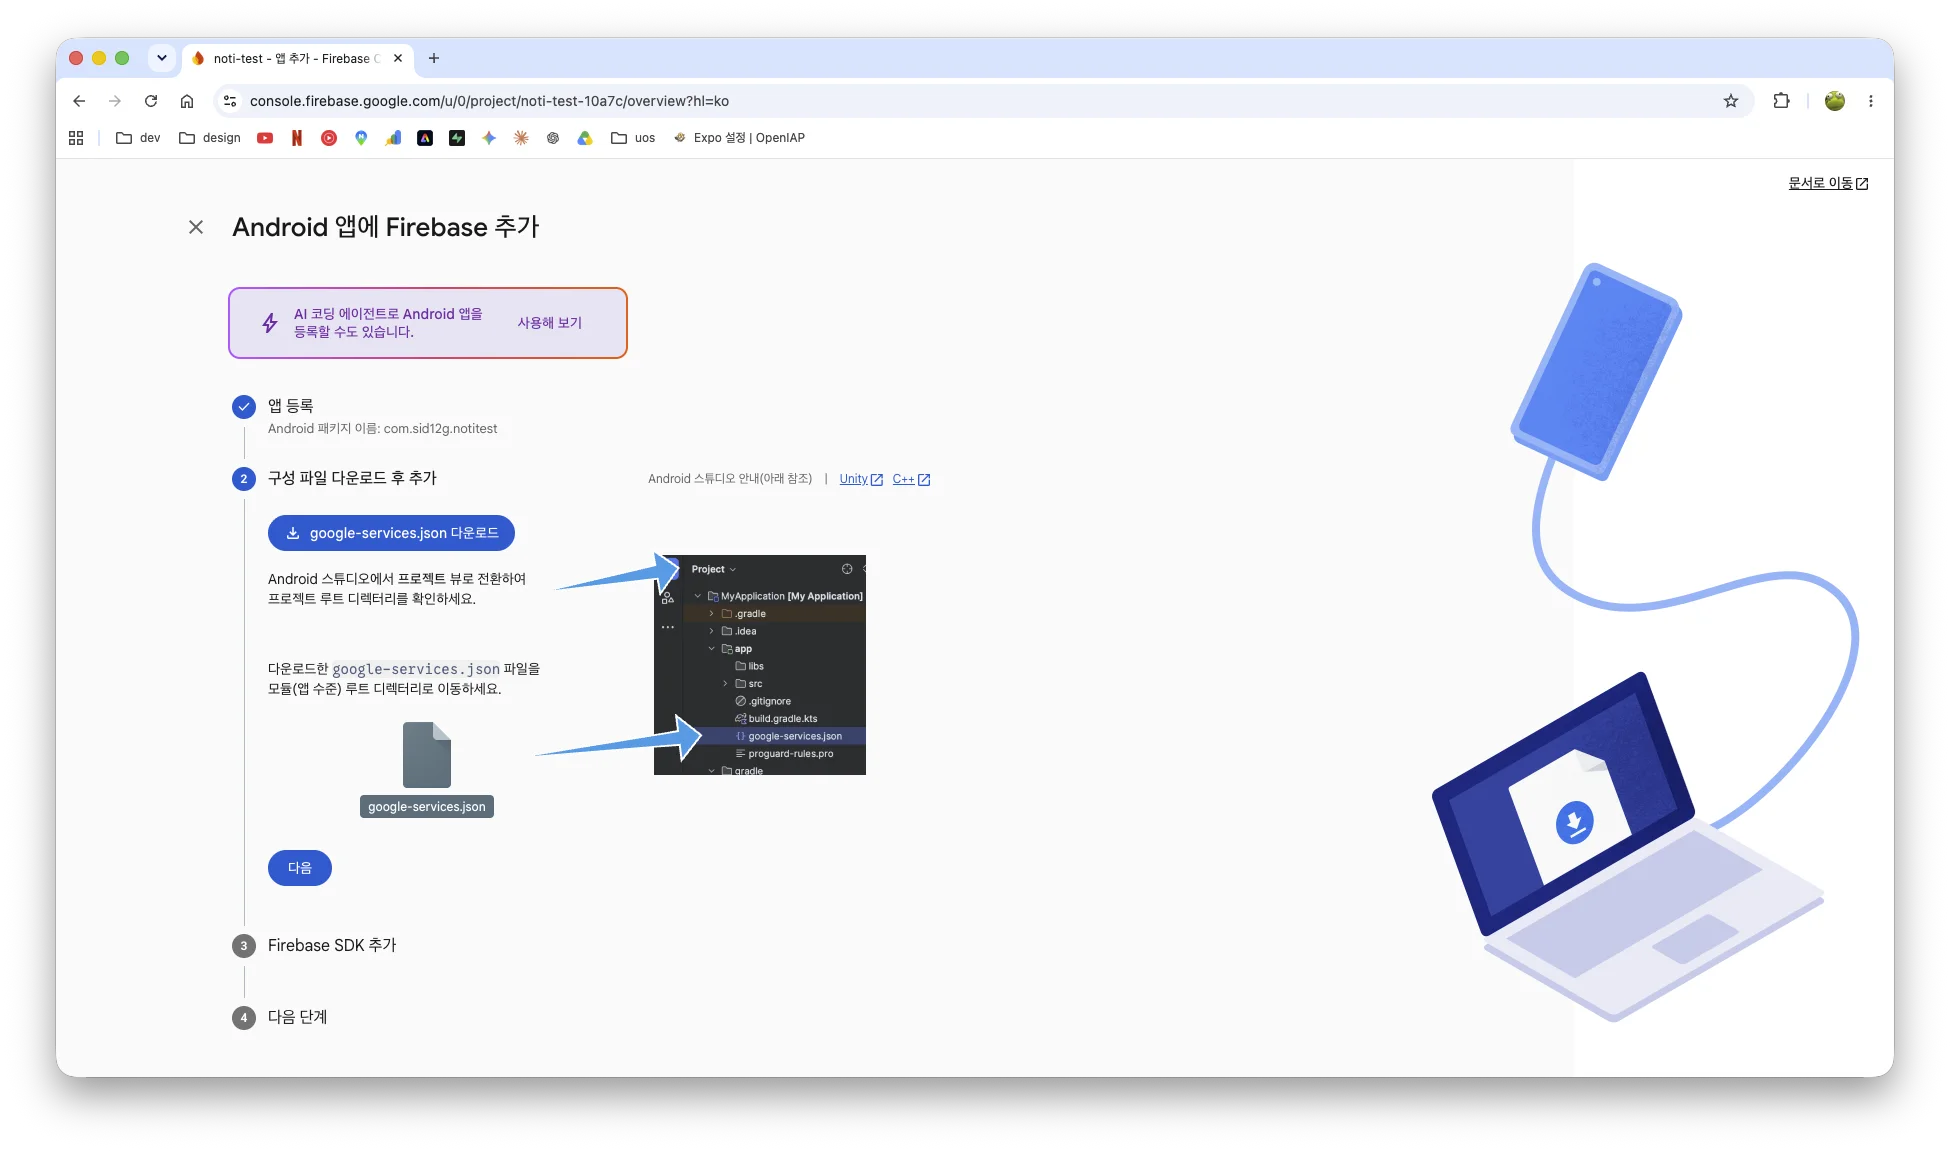
다운로드한 google-services.json을 Expo 프로젝트 루트에 추가한다.
project/
├── app.json
├── google-services.json
├── package.json
└── ...
그리고 app.json에 googleServicesFile을 설정한다.
{
  "expo": {
    "android": {
      "package": "com.sid12g.notitest",
      "googleServicesFile": "./google-services.json"
    }
  }
}google-services.json은 Android 앱이 Firebase와 연결되어 FCM을 사용할 수 있도록 해주는 설정 파일이다.
이 설정은 네이티브 Android 프로젝트에 반영되기 때문에 기존 앱을 실행하는 것만으로는 적용되지 않는다.
다시 빌드해야 한다.
pnpm expo run:androidGoogle Service Account Key 생성
이제 Expo Push Service가 FCM을 통해 알림을 보낼 수 있도록 FCM V1용 Google Service Account Key를 등록해야 한다.
Firebase Console에서 다음 경로로 이동한다.
프로젝트 설정
↓
서비스 계정
↓
Firebase Admin SDK
그리고 새 비공개 키 생성을 클릭한다.
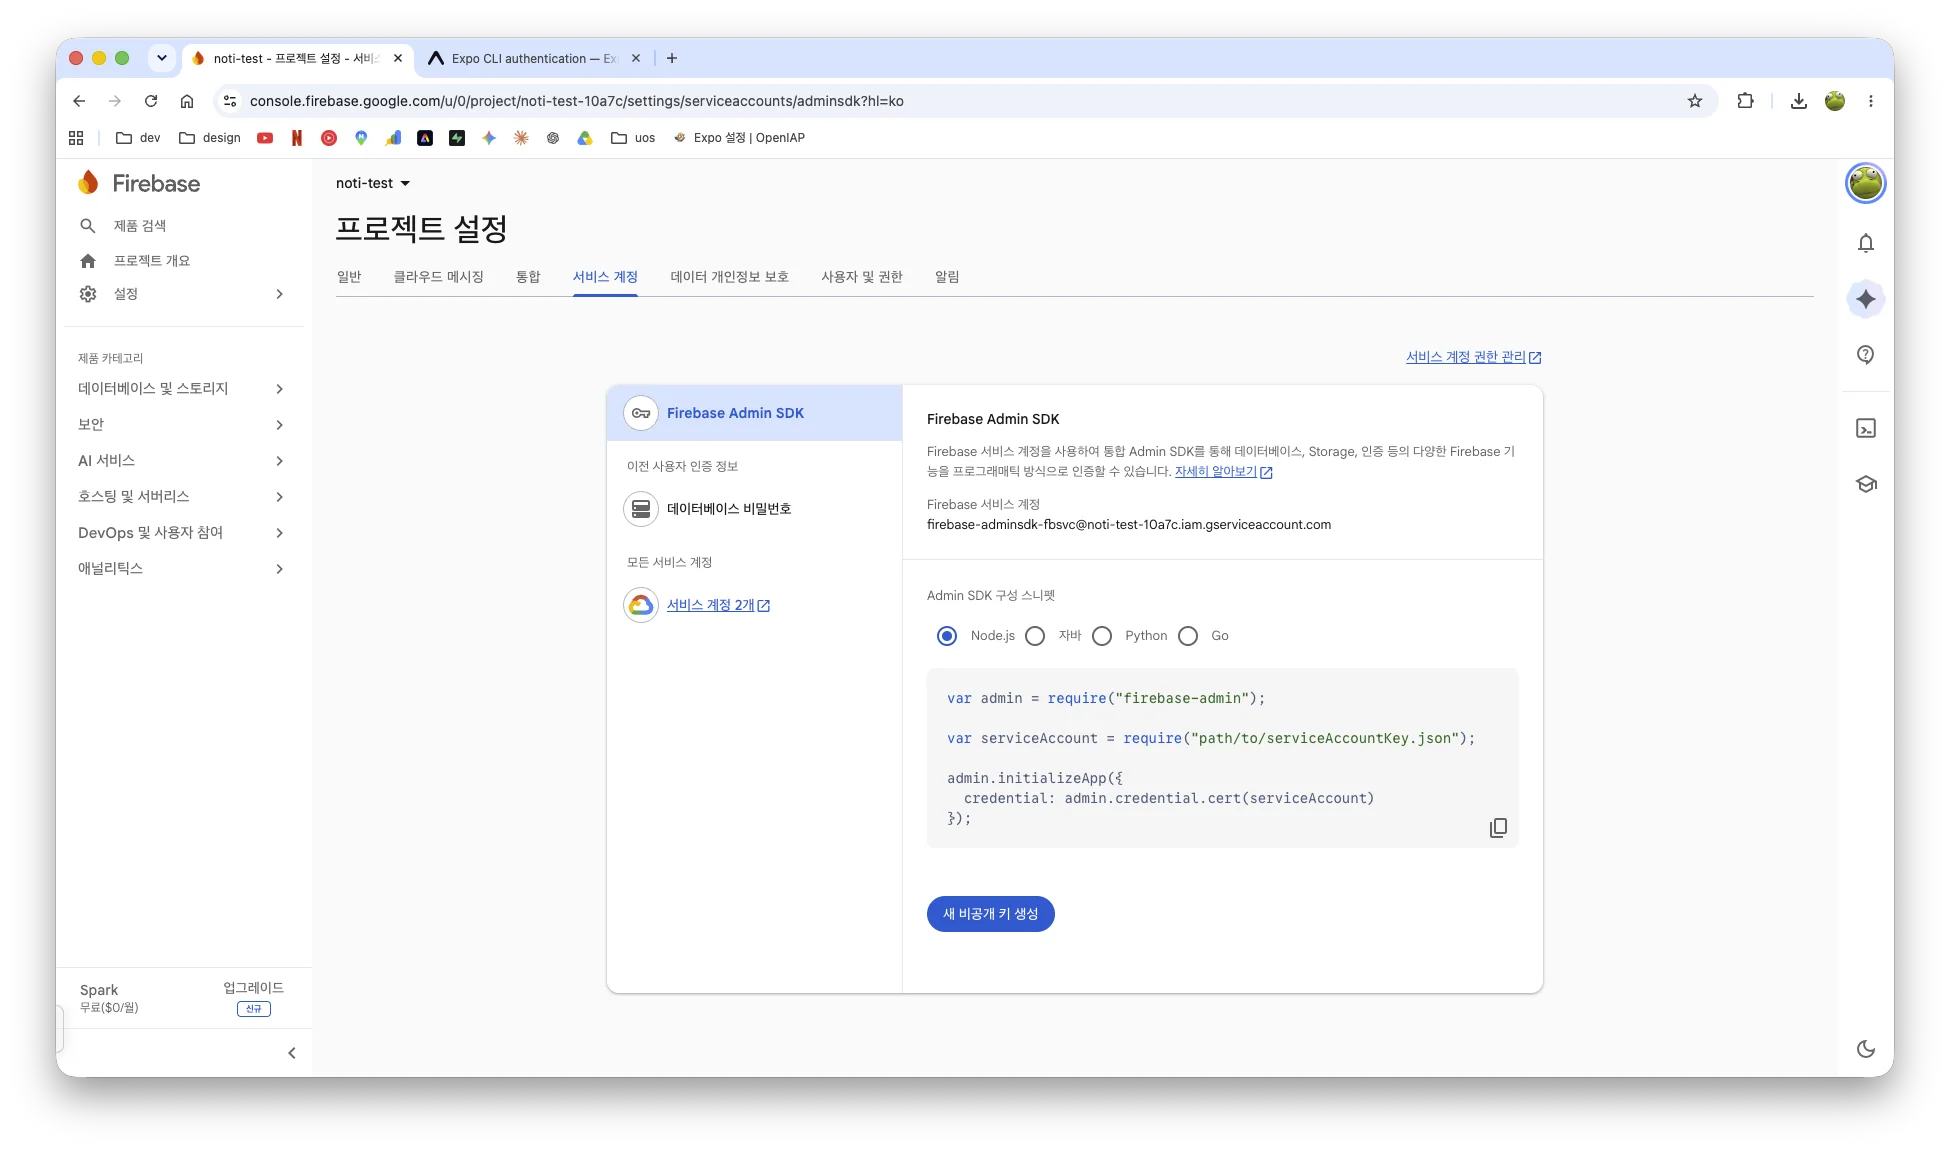
그러면 JSON 형식의 Service Account Key가 다운로드된다.
이 파일은 google-services.json과 용도가 다르다.
| 파일 | 용도 |
|---|---|
google-services.json | Android 앱 → Firebase / FCM |
| Service Account Key JSON | Expo Push Service → FCM |
Service Account Key에는 비밀키가 포함되어 있으므로 Git에 커밋해서는 안 된다.
프로젝트 내부에 보관하는 경우 반드시 .gitignore에 추가해야 한다.
*-firebase-adminsdk-*.jsonEAS Build 설정
eas credentials를 사용하려면 먼저 eas.json이 필요하다.
아직 생성하지 않았다면 다음 명령어를 실행한다.
eas build:configure -p android프로젝트 루트에 다음과 같은 eas.json이 생성된다.
{
  "build": {
    "development": {
      "developmentClient": true,
      "distribution": "internal"
    },
    "preview": {
      "distribution": "internal"
    },
    "production": {}
  }
}
이후 다음 명령어를 실행한다.
eas credentials -p androidFCM V1용 Service Account Key를 등록한다.
메뉴 이름은 EAS CLI 버전에 따라 조금씩 다를 수 있지만 대략 다음 순서로 진행한다.
Android
↓
production
↓
Google Service Account
↓
Manage your Google Service Account Key for Push Notifications (FCM V1)
↓
Set up a Google Service Account Key for Push Notifications (FCM V1)
↓
Upload a new service account key
앞에서 Firebase에서 생성한 Service Account Key JSON을 선택하면 된다.
이렇게 하면 전체 구조는 다음과 같다.
Android App
    │
    │ google-services.json
    ▼
Firebase / FCM
    ▲
    │
    │ Google Service Account Key
    │
Expo Push Service
    ▲
    │
    │ Expo Push Token
    │
Server
Expo Go 주의사항
Expo SDK 53부터 Android의 원격 푸시 알림(Remote Push Notification)은 Expo Go에서 지원되지 않는다.
따라서 푸시 알림을 테스트하려면 Expo Go가 아닌 Development Build 또는 직접 빌드한 앱을 사용해야 한다.
로컬에서 개발용 앱을 빌드한다면 다음과 같이 실행할 수 있다.
pnpm expo run:android이후에는 Metro를 실행하여 개발할 수 있다.
pnpm expo start알림 서버 만들기
앱 설정이 끝났다면 Express를 이용하여 간단한 Push Notification 테스트 서버를 만들어보자.
먼저 프로젝트를 생성한다.
mkdir expo-push-test
cd expo-push-test

npm init -y
npm install expresspackage.json에서 ES Module을 사용하는 경우 다음과 같이 설정한다.
{
  "type": "module"
}
이후 index.js를 작성한다.
// index.js

import express from "express";

const app = express();
const PORT = 3000;

app.use(express.json());
app.use(express.urlencoded({ extended: true }));

app.get("/", (req, res) => {
  res.send(`
    <!DOCTYPE html>
    <html lang="ko">
      <head>
        <meta charset="UTF-8" />
        <meta name="viewport" content="width=device-width, initial-scale=1.0" />
        <title>Expo Push Tester</title>

        <style>
          body {
            font-family: sans-serif;
            max-width: 600px;
            margin: 50px auto;
            padding: 20px;
          }

          input,
          textarea,
          button {
            box-sizing: border-box;
            width: 100%;
            margin-bottom: 12px;
            padding: 12px;
            font-size: 16px;
          }

          textarea {
            min-height: 100px;
          }

          button {
            cursor: pointer;
          }

          #result {
            white-space: pre-wrap;
            background: #f5f5f5;
            padding: 16px;
          }
        </style>
      </head>

      <body>
        <h1>🔔 Expo Push Tester</h1>

        <input
          id="token"
          placeholder="ExponentPushToken[...]"
        />

        <input
          id="title"
          value="테스트 알림"
          placeholder="제목"
        />

        <textarea
          id="body"
          placeholder="알림 내용"
        >Expo Push Notification 테스트입니다.</textarea>

        <button onclick="sendNotification()">
          알림 보내기
        </button>

        <pre id="result"></pre>

        <script>
          async function sendNotification() {
            const token = document.getElementById("token").value;
            const title = document.getElementById("title").value;
            const body = document.getElementById("body").value;

            const resultElement = document.getElementById("result");

            resultElement.textContent = "전송 중...";

            try {
              const response = await fetch("/send", {
                method: "POST",
                headers: {
                  "Content-Type": "application/json",
                },
                body: JSON.stringify({
                  token,
                  title,
                  body,
                }),
              });

              const result = await response.json();

              resultElement.textContent =
                JSON.stringify(result, null, 2);
            } catch (error) {
              resultElement.textContent =
                error instanceof Error
                  ? error.message
                  : String(error);
            }
          }
        </script>
      </body>
    </html>
  `);
});

app.post("/send", async (req, res) => {
  try {
    const { token, title, body } = req.body;

    if (!token) {
      return res.status(400).json({
        success: false,
        message: "Expo Push Token이 필요합니다.",
      });
    }

    const message = {
      to: token,
      sound: "default",
      title: title || "테스트 알림",
      body: body || "Expo Push Notification 테스트입니다.",
      data: {
        source: "express-test",
      },
    };

    const response = await fetch("https://exp.host/--/api/v2/push/send", {
      method: "POST",
      headers: {
        Accept: "application/json",
        "Accept-Encoding": "gzip, deflate",
        "Content-Type": "application/json",
      },
      body: JSON.stringify(message),
    });

    const result = await response.json();

    console.log("Expo response:", result);

    const success = result.data?.status === "ok";

    res.status(success ? 200 : 400).json({
      success,
      expo: result,
    });
  } catch (error) {
    console.error(error);

    res.status(500).json({
      success: false,
      message: error instanceof Error ? error.message : "알림 전송 실패",
    });
  }
});

app.listen(PORT, () => {
  console.log(`🚀 http://localhost:${PORT}`);
});
서버를 실행한다.
node index.js이후 브라우저에서 다음 주소로 접속한다.
http://localhost:3000
앱에서 발급받은 Expo Push Token을 입력하고 제목과 내용을 작성한 뒤 알림을 전송할 수 있다.
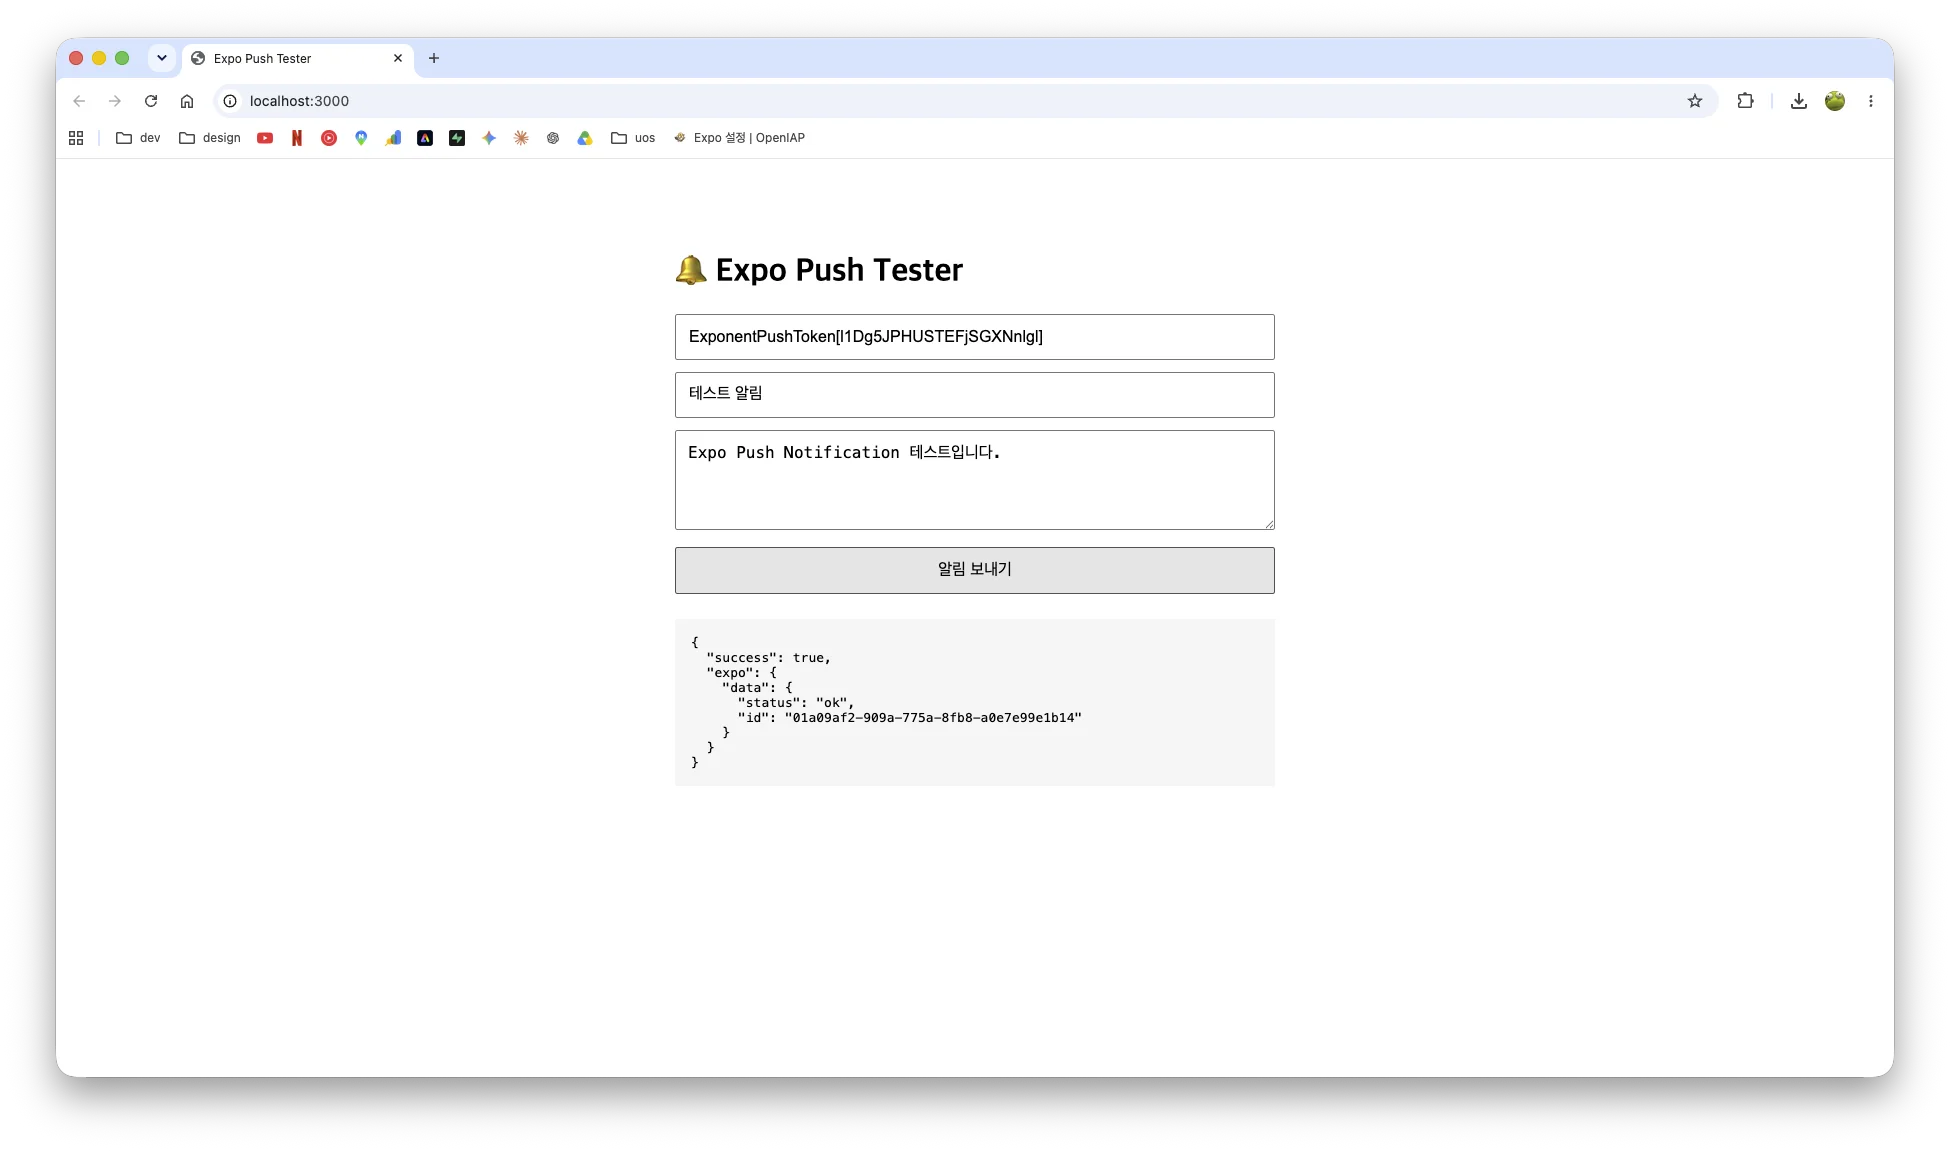
정상적으로 전송되면 Expo Push Service에서 다음과 같이 Push Ticket을 반환한다.
{
  "data": {
    "status": "ok",
    "id": "<push-ticket-id>"
  }
}
그리고 Android 기기에서 실제 알림을 확인할 수 있다.
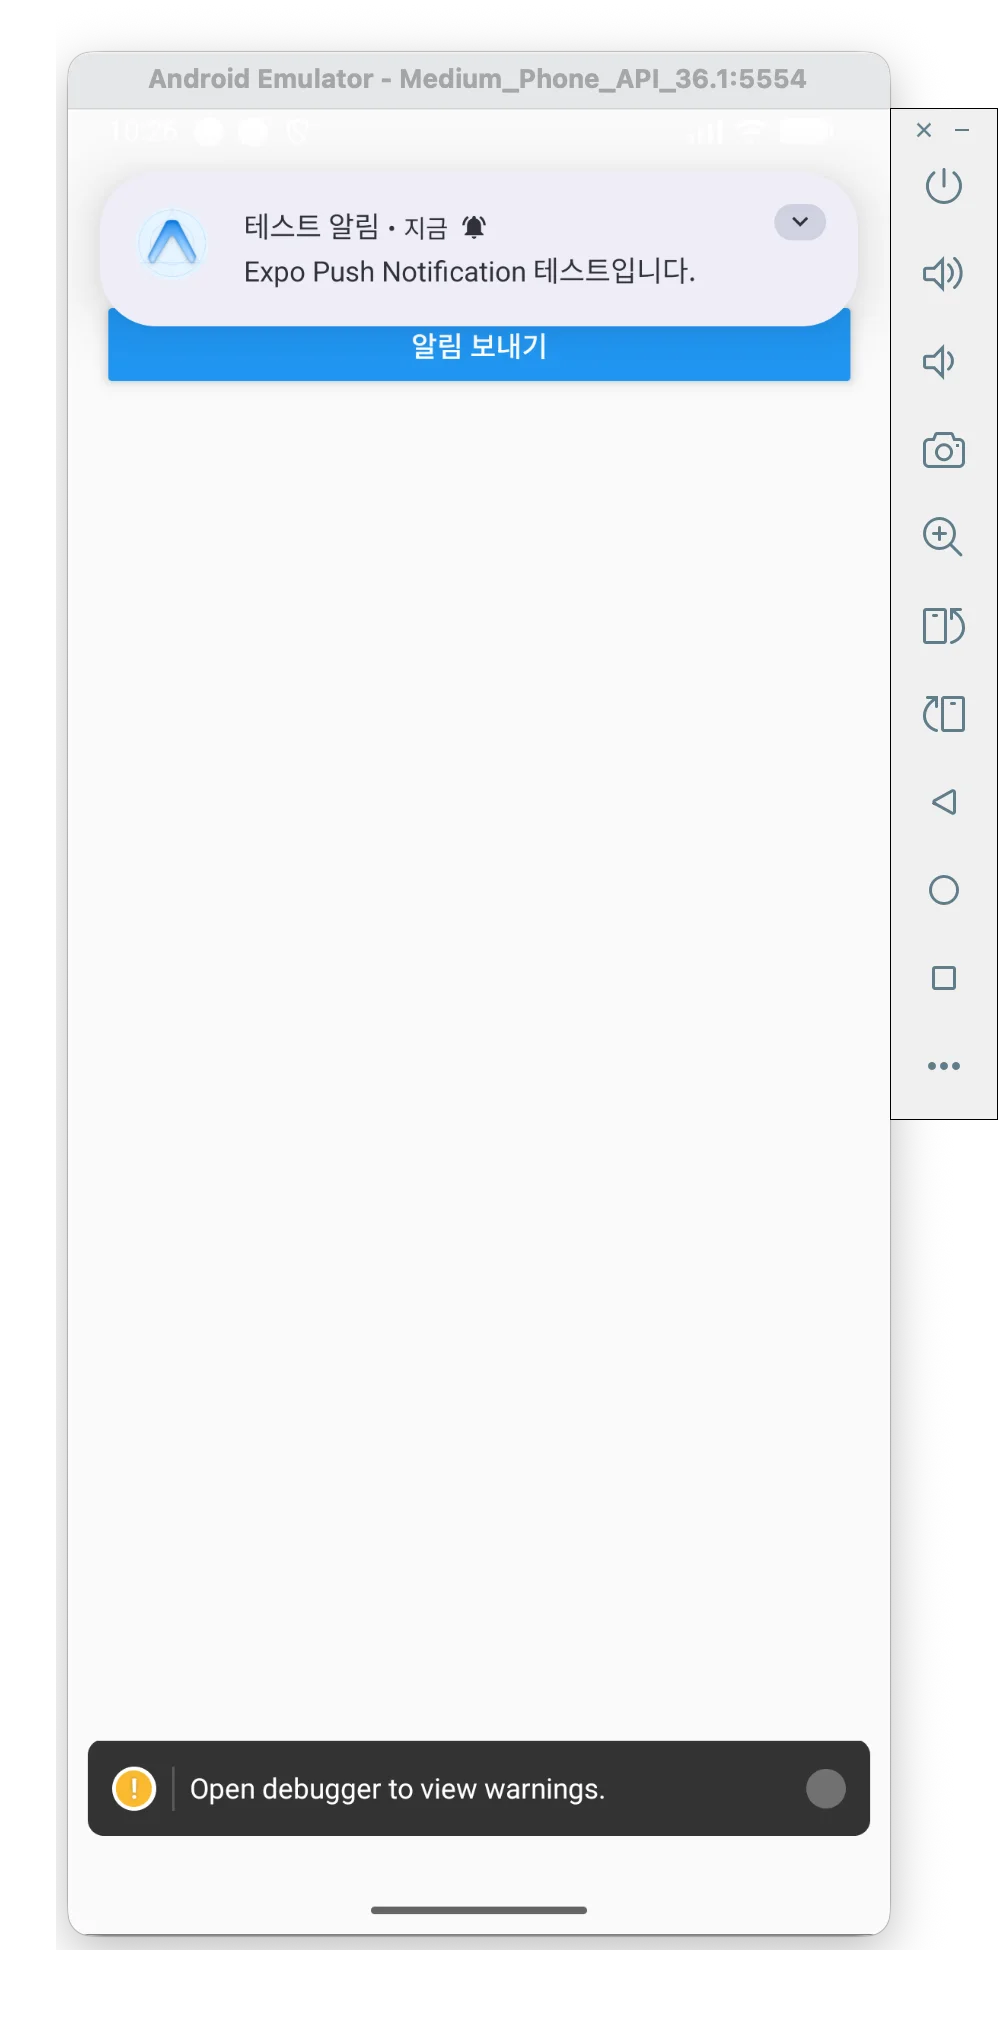
status: "ok"는 Expo Push Service가 전송 요청을 정상적으로 접수했다는 의미이다.
실제 APNs 또는 FCM을 통해 최종적으로 전달되었는지까지 확인해야 하는 서비스라면 반환된 Push Ticket ID를 이용하여 Push Receipt를 조회하는 과정도 추가할 수 있다.